之前我為了要把fedora 7下載下來,並燒錄成光碟。
為了這個目的,我學了如何在我的ubuntu上,
裝上KTorrent、K3b等套件,可說是費盡苦心啊!
後來找了些有關ISO檔的文件資料,
發現原來在linux下,可以這麼輕鬆的編製ISO檔案,以及燒錄ISO!
只要用一些簡單的指令就可以。
我舉幾個範例來說明以下我要介紹的指令:
1.我只有光碟機,怎麼做成ISO檔?
$sudo umount /dev/cdrom
放入光碟後,要卸載你的光碟。不過這是網路上文件建議的,好像不卸載也行! 要測...
$dd if=/dev/cdrom of=image_file.iso bs=1024 &
那個參數 bs=1024可略,功用是指定讀取資料用1024byte的速度,是用bs=512也行。
指令最後我加了&,是為了丢到背景執行,好讓我不必因為製作ISO而停用了shell。
兩行指令就成了,比在windows方便多了。對吧!
好,檢查一下!
$ls -lh image_file.iso
查看檔案大小,是否就是光碟片資料大小,搞定!
還有一個我們常用的指令也辦得到...
$cp /dev/cdrom image_file.iso &
linux可怕吧!這麼好用的OS,你還不想用嗎?
還有一個指令可用mkisofs。底下會提到,就是把一個目錄下的所有檔案,製成一個ISO檔。
2.用ISO檔的方式來做備份!
傳統備份是用tar指令來把資料倒到磁帶,但我們也可以直接把資料檔製成ISO。
$mkisofs -o user_image_file_or_dir.iso -r /home/username
把某使用者家目錄下的全部資料,製成一個ISO檔。
-r和用-R參數都行,功用是保留檔案屬性和格式,詳細情形要找「男人」man才知道。
而為了可以日後燒錄成真正的光碟,請注意你的ISO大小,不然燒不進去哦!
一般是把ISO檔案大小控制在650MB左右啦。
所以前面提到的把光碟製成ISO,可以先把光碟掛載好,
然後把光碟資料的那個目錄,以mkisofs指令完成ISO製作。OK!
#mount -t iso9660 /dev/cdrom /media/cdrom0
#mkisofs -o image_file.iso -r /media/cdrom0
3.驗證ISO檔是否製作成功?或是我要看ISO檔內容?
#mkdir -p /mnt/iso
#mount -t iso9660 -o loop image_file.iso /mnt/cdrom
#cd /mnt/iso
就能看到原ISO資料的目錄內容,來檢查檔案完整否?
2007年7月26日 星期四
2007年7月21日 星期六
為了fedora7裝k3b
好不容易用ktorrent把Fedora 7 下載下來,
當然要燒成光碟啊!
再裝個燒錄工具...
OK!就挑k3b吧,名字很奇怪,
但聽說功能不錯。
root@bullock-desktop:~# apt-get install k3b
Reading package lists... Done
Building dependency tree
Reading state information... Done
The following packages were automatically installed and are no longer required:
libltdl3
Use 'apt-get autoremove' to remove them.
The following extra packages will be installed:
kdebase-bin libdbus-qt-1-1c2 libflac++5c2 libk3b2 libmpcdec3
Suggested packages:
k3b-i18n normalize-audio toolame sox movixmaker-2 libk3b2-mp3 khelpcenter
Recommended packages:
vcdimager kdebase-kio-plugins kcontrol
The following NEW packages will be installed:
k3b kdebase-bin libdbus-qt-1-1c2 libflac++5c2 libk3b2 libmpcdec3
0 upgraded, 6 newly installed, 0 to remove and 0 not upgraded.
Need to get 7596kB of archives.
After unpacking 16.5MB of additional disk space will be used.
Do you want to continue [Y/n]? Y
Get:1 http://tw.archive.ubuntu.com feisty/main libdbus-qt-1-1c2 0.62.git.20060814-2build1 [181kB]
Get:2 http://tw.archive.ubuntu.com feisty/main libflac++5c2 1.1.2-5ubuntu2 [47.2kB]
Get:3 http://tw.archive.ubuntu.com feisty/main libmpcdec3 1.2.2-1 [25.3kB]
Get:4 http://tw.archive.ubuntu.com feisty/main libk3b2 1.0-0ubuntu2 [1031kB]
Get:5 http://tw.archive.ubuntu.com feisty-updates/main kdebase-bin 4:3.5.6-0ubuntu20.1 [1281kB]
Get:6 http://tw.archive.ubuntu.com feisty/main k3b 1.0-0ubuntu2 [5030kB]
Fetched 7596kB in 34s (220kB/s)
Selecting previously deselected package libdbus-qt-1-1c2.
(Reading database ... 126180 files and directories currently installed.)
Unpacking libdbus-qt-1-1c2 (from .../libdbus-qt-1-1c2_0.62.git.20060814-2build1_i386.deb) ...
Selecting previously deselected package libflac++5c2.
Unpacking libflac++5c2 (from .../libflac++5c2_1.1.2-5ubuntu2_i386.deb) ...
Selecting previously deselected package libmpcdec3.
Unpacking libmpcdec3 (from .../libmpcdec3_1.2.2-1_i386.deb) ...
Selecting previously deselected package libk3b2.
Unpacking libk3b2 (from .../libk3b2_1.0-0ubuntu2_i386.deb) ...
Selecting previously deselected package kdebase-bin.
Unpacking kdebase-bin (from .../kdebase-bin_4%3a3.5.6-0ubuntu20.1_i386.deb) ...
Selecting previously deselected package k3b.
Unpacking k3b (from .../k3b_1.0-0ubuntu2_i386.deb) ...
Setting up libdbus-qt-1-1c2 (0.62.git.20060814-2build1) ...
Setting up libflac++5c2 (1.1.2-5ubuntu2) ...
Setting up libmpcdec3 (1.2.2-1) ...
Setting up libk3b2 (1.0-0ubuntu2) ...
Setting up kdebase-bin (3.5.6-0ubuntu20.1) ...
Setting up k3b (1.0-0ubuntu2) ...
root@bullock-desktop:~#
2007年7月20日 星期五
為了fedora7裝ktorrent
說實在,我沒用過BT,不過看到網路上提供的Fedora7下載,
居然要使用者以BT的方式,把它download下來...我認了!
我的第一次BT,獻給ubuntu 7.04的這個主機OS環境。
OK,來吧,在linux使用BT下載軟體。
查了一下google,我懶得多看,
好像有個在KDE執行的BT軟體,叫ktorrent。不過也可以在GNOME使用。
用sudo apt-get install ktorrent就能進行安裝!
root@bullock-desktop:/boot/grub# apt-get install ktorrent
Reading package lists... Done
Building dependency tree
Reading state information... Done
The following packages were automatically installed and are no longer required:
libltdl3
Use 'apt-get autoremove' to remove them.
The following extra packages will be installed:
kdelibs-data kdelibs4c2a libarts1c2a libavahi-qt3-1 libgmp3c2 liblua50
liblualib50 libopenexr2c2a
Suggested packages:
fam
Recommended packages:
perl-suid libarts1-akode
The following NEW packages will be installed:
kdelibs-data kdelibs4c2a ktorrent libarts1c2a libavahi-qt3-1 libgmp3c2
liblua50 liblualib50 libopenexr2c2a
0 upgraded, 9 newly installed, 0 to remove and 0 not upgraded.
Need to get 22.3MB of archives.
After unpacking 73.3MB of additional disk space will be used.
Do you want to continue [Y/n]? Y
哇!一個BT竟然因為相依性,要多裝這麼多套件啊!SHIT...也能裝了,不然怎麼繼續!
Get:1 http://tw.archive.ubuntu.com feisty/main kdelibs-data 4:3.5.6-0ubuntu14 [7218kB]
Get:2 http://archive.ubuntu.com feisty-backports/main ktorrent 2.2-0ubuntu1~feisty1 [3282kB]
Get:3 http://tw.archive.ubuntu.com feisty/main libarts1c2a 1.5.6-0ubuntu1 [995kB]
Get:4 http://tw.archive.ubuntu.com feisty/main libavahi-qt3-1 0.6.17-0ubuntu3 [29.5kB]
Get:5 http://tw.archive.ubuntu.com feisty/main liblua50 5.0.3-2build1 [48.9kB]
Get:6 http://tw.archive.ubuntu.com feisty/main liblualib50 5.0.3-2build1 [35.3kB]
Get:7 http://tw.archive.ubuntu.com feisty/main libopenexr2c2a 1.2.2-4.3ubuntu1 [304kB]
Get:8 http://tw.archive.ubuntu.com feisty/main kdelibs4c2a 4:3.5.6-0ubuntu14 [9972kB]
Get:9 http://tw.archive.ubuntu.com feisty/main libgmp3c2 2:4.2.1+dfsg-4build1 [436kB]
Fetched 22.3MB in 1m51s (201kB/s)
Selecting previously deselected package kdelibs-data.
(Reading database ... 120907 files and directories currently installed.)
Unpacking kdelibs-data (from .../kdelibs-data_4%3a3.5.6-0ubuntu14_all.deb) ...
Selecting previously deselected package libarts1c2a.
Unpacking libarts1c2a (from .../libarts1c2a_1.5.6-0ubuntu1_i386.deb) ...
Selecting previously deselected package libavahi-qt3-1.
Unpacking libavahi-qt3-1 (from .../libavahi-qt3-1_0.6.17-0ubuntu3_i386.deb) ...
Selecting previously deselected package liblua50.
Unpacking liblua50 (from .../liblua50_5.0.3-2build1_i386.deb) ...
Selecting previously deselected package liblualib50.
Unpacking liblualib50 (from .../liblualib50_5.0.3-2build1_i386.deb) ...
Selecting previously deselected package libopenexr2c2a.
Unpacking libopenexr2c2a (from .../libopenexr2c2a_1.2.2-4.3ubuntu1_i386.deb) ...
Selecting previously deselected package kdelibs4c2a.
Unpacking kdelibs4c2a (from .../kdelibs4c2a_4%3a3.5.6-0ubuntu14_i386.deb) ...
Selecting previously deselected package libgmp3c2.
Unpacking libgmp3c2 (from .../libgmp3c2_2%3a4.2.1+dfsg-4build1_i386.deb) ...
Selecting previously deselected package ktorrent.
Unpacking ktorrent (from .../ktorrent_2.2-0ubuntu1~feisty1_i386.deb) ...
Setting up kdelibs-data (3.5.6-0ubuntu14) ...
Setting up libarts1c2a (1.5.6-0ubuntu1) ...
Setting up libavahi-qt3-1 (0.6.17-0ubuntu3) ...
Setting up liblua50 (5.0.3-2build1) ...
Setting up liblualib50 (5.0.3-2build1) ...
Setting up libopenexr2c2a (1.2.2-4.3ubuntu1) ...
Setting up kdelibs4c2a (3.5.6-0ubuntu14) ...
Setting up libgmp3c2 (4.2.1+dfsg-4build1) ...
Setting up ktorrent (2.2-0ubuntu1~feisty1) ...
root@bullock-desktop:/boot/grub#
安裝完成,就到:應用程式->網際網路->KTorrent 執行它!
2007年7月19日 星期四
關於硬碟...(救急可用)
最近突然對硬碟的一些知識有興趣,
於是我上網找了些資料,
順便補強了一些我對硬碟使用的常識。
我先插個題目,讓上網看我BLOG的人,有個收獲先!
通常我們買了一顆硬碟,很少有人會仔細去看上面的標示吧!
例如我有顆硬碟,上頭標示了:
2111MB 4092 cyl 16 heads 53 sectors
它究竟代表了那些意義?如何計算硬碟大小?
我把硬碟大小的計算公式寫出來,再補相關知識,OK!
<公式>
cylinders(磁柱數) x heads(磁頭數) x sectors(磁區數) x 512 bytes = 你的硬碟多大
所以我那顆硬碟有...
4092 x 16 x 53 x 512 =2111,864,832 bytes
等於是2111,865KB,也可說是2111MB,更乾脆就說是2G的硬碟啦!
再回去對照標示,你就懂了,原來我的硬碟大小有2111Maga Bytes,「兩居」啊。
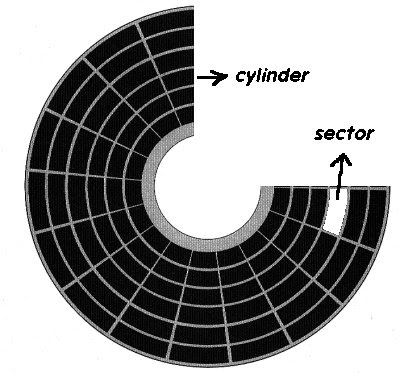
至於cylinder(磁柱),head(磁頭),sector(磁區)等名詞,
除非你要自訂你的電腦檔案系統,不然其實這些資訊實在很少用得到,
但要搞懂檔案系統的話,這知識就是必修的了。
比如像我想玩LINUX,安裝時就要規劃硬碟空間,可不能裝迷糊啊!
先對硬碟的構造概略的講解一下,我才能往下走!
cylinder可以想成光碟片上有一圈圈的分割線,分割好每一圈就是一個cylinder。
而head就是讀寫資料的裝置-磁頭,就想像成你的硬碟內有幾片像光碟片的東東,
而硬碟有幾個head就表示有多少放資料的碟片。
最後要知道sector,是磁區的意思,可想成cylinder分割完後,
再切成一塊塊的區塊,而一個sector通常被廠商低階格式化成512bytes大小。
整合以上所述,公式應該就不難理解了吧!
不過我要特別說明,我的解說還不是最正確,只能算是概說。
因為硬碟的構造,一般人不會去打開來看的,切記!
打開硬碟可是有極大的風險!除非是己經壞掉的硬碟。
但是如果你有機會去看到硬碟內的構造,
除了head可以數得出來以外,cylinder和sector這兩樣,
是像經緯度一樣,很抽象的東西,是看不出,數不出來的。
下面我會提供一個示意圖,然後給幾個網址,
連過去也會有相關知識,以及照片可以參考。
示意圖
以下提供的網址,是幾個維修硬碟的廠商,加上他們提供的資訊。
老實說,除非硬碟上放的資料極其重要,而你又沒有備份,
然後你的MIS人員又搞不定或者你本身就是MIS...
那你才會需要向這些廠商求救!
不然,就我做MIS的經驗,維修硬碟,實在費時費力,
真正到送修地步,他們的收費可真不便宜。
台北-凌威科技 http://www.linwei.com.tw/knowhdd.html
台南-伯爵電腦 http://www.earl.com.tw/tech/wdhd.htm
南投-硬碟醫院 ...
2007年7月10日 星期二
新增磁區並加以格式化
運用fdisk來增修磁碟,然後以mke2fs格式化成ext3磁區!
root@bullock-desktop:~# mke2fs -j -L "backup" /dev/sda2
mke2fs 1.40-WIP (14-Nov-2006)
Filesystem label=backup
OS type: Linux
Block size=4096 (log=2)
Fragment size=4096 (log=2)
3933120 inodes, 7865825 blocks
393291 blocks (5.00%) reserved for the super user
First data block=0
Maximum filesystem blocks=0
241 block groups
32768 blocks per group, 32768 fragments per group
16320 inodes per group
Superblock backups stored on blocks:
32768, 98304, 163840, 229376, 294912, 819200, 884736, 1605632, 2654208,
4096000
Writing inode tables: done
Creating journal (32768 blocks): done
Writing superblocks and filesystem accounting information: done
This filesystem will be automatically checked every 26 mounts or
180 days, whichever comes first. Use tune2fs -c or -i to override.
root@bullock-desktop:~#
設定quota之前...安裝...
安裝可以設定 quota 功能的套件!
$sudo apt-get install quota
安裝完成後,出現quot quota quotacheck quotaoff quotaon quotastats 等指令...
root@bullock-desktop:/etc/xinetd.d# apt-get install quota
Reading package lists... Done
Building dependency tree
Reading state information... Done
The following packages were automatically installed and are no longer required:
libartsc0 libltdl3
Use 'apt-get autoremove' to remove them.
The following NEW packages will be installed:
quota
0 upgraded, 1 newly installed, 0 to remove and 0 not upgraded.
Need to get 424kB of archives.
After unpacking 1294kB of additional disk space will be used.
Get:1 http://tw.archive.ubuntu.com feisty/main quota 3.14-6 [424kB]
Fetched 424kB in 2s (164kB/s)
Preconfiguring packages ...
Selecting previously deselected package quota.
(Reading database ... 120850 files and directories currently installed.)
Unpacking quota (from .../archives/quota_3.14-6_i386.deb) ...
Setting up quota (3.14-6) ...
root@bullock-desktop:/etc/xinetd.d# quot
quot quota quotacheck quotaoff quotaon quotastats
root@bullock-desktop:/etc/xinetd.d# quot
quot quota quotacheck quotaoff quotaon quotastats
root@bullock-desktop:/etc/xinetd.d# quota -h
quota: invalid option -- h
quota: Usage: quota [-guqvsw] [-l | -Q] [-i] [-F quotaformat]
quota [-qvsw] [-l | -Q] [-i] [-F quotaformat] -u username ...
quota [-qvsw] [-l | -Q] [-i] [-F quotaformat] -g groupname ...
quota [-qvswugQ] [-F quotaformat] -f filesystem ...
-u, --user display quota for user
-g, --group display quota for group
-q, --quiet print more terse message
-v, --verbose print more verbose message
-s, --human-readable display numbers in human friendly units (MB, GB...)
--always-resolve always try to translate name to id, even if it is
composed of only digits
-w, --no-wrap do not wrap long lines
-l, --local-only do not query NFS filesystems
-Q, --quiet-refuse do not print error message when NFS server does
not respond
-i, --no-autofs do not query autofs mountpoints
-F, --format=formatname display quota of a specific format
-f, --filesystem-list display quota information only for given filesystems
-h, --help display this help message and exit
-V, --version display version information and exit
Bugs to: jack@suse.cz
root@bullock-desktop:/etc/xinetd.d#
2007年7月6日 星期五
在ubuntu以proftp架FTP SERVER
在ubuntu安裝實在很簡單,
自從有了apt這麼好用的套件,
我一用ubuntu就上癮了!
proftp安裝好了,執行的模式有兩種,standalone和inet。
我查了一下,用inet模式似乎較為安全,
至於為什麼,待我用過這軟體,功力進階一些再來做筆記吧!
root@bullock-desktop:~# apt-get install proftpd
Reading package lists... Done
Building dependency tree
Reading state information... Done
The following packages were automatically installed and are no longer required:
libartsc0 libltdl3
Use 'apt-get autoremove' to remove them.
Suggested packages:
proftpd-doc
The following NEW packages will be installed:
proftpd
0 upgraded, 1 newly installed, 0 to remove and 0 not upgraded.
Need to get 784kB of archives.
After unpacking 2331kB of additional disk space will be used.
Get:1 http://tw.archive.ubuntu.com feisty/universe proftpd 1.3.0-21ubuntu1 [784kB]
Fetched 784kB in 7s (111kB/s)
Preconfiguring packages ...
Selecting previously deselected package proftpd.
(Reading database ... 120484 files and directories currently installed.)
Unpacking proftpd (from .../proftpd_1.3.0-21ubuntu1_i386.deb) ...
Setting up proftpd (1.3.0-21ubuntu1) ...
--------- IMPORTANT INFORMATION FOR XINETD USERS ----------
The following line will be added to your /etc/inetd.conf file:
ftp stream tcp nowait root /usr/sbin/tcpd /usr/sbin/proftpd
If you are indeed using xinetd, you will have to convert the
above into /etc/xinetd.conf format, and add it manually. See
/usr/share/doc/xinetd/README.Debian for more information.
-----------------------------------------------------------
Adding system user `proftpd' (UID 115) ...
Adding new user `proftpd' (UID 115) with group `nogroup' ...
Not creating home directory `/var/run/proftpd'.
Adding system user `ftp' (UID 116) ...
Adding new user `ftp' (UID 116) with group `nogroup' ...
Creating home directory `/home/ftp' ...
`/usr/share/proftpd/templates/welcome.msg' -> `/home/ftp/welcome.msg.proftpd-new'
ProFTPd warning: cannot start neither in standalone nor in inetd/xinetd mode. Check your configuration.
root@bullock-desktop:~#
2007年7月2日 星期一
2007年7月1日 星期日
續-建置一部transparent proxy
root@bullock-desktop:/etc/network# cat /proc/sys/net/ipv4/ip_forward
0
root@bullock-desktop:/etc/network# echo "1" > /proc/sys/net/ipv4/ip_forward
root@bullock-desktop:/etc/network# cat /proc/sys/net/ipv4/ip_forward
1
root@bullock-desktop:/etc/network# modprobe ip_tables
root@bullock-desktop:/etc/network# modprobe ip_nat_ftp
root@bullock-desktop:/etc/network# modprobe ip_conntrack
root@bullock-desktop:/etc/network# modprobe ip_conntrack_ftp
root@bullock-desktop:/etc/network# modprobe ip_conntrack_irc
root@bullock-desktop:/etc/network# iptables -t nat -A PREROUTING -p tcp -s 10.1.128.0/22 --dport 80 -j REDIRECT --to-ports 3128
root@bullock-desktop:/etc/network# iptables -t nat -A POSTROUTING -o br0 -s 10.1.128.0/22 -j MASQUERADE
root@bullock-desktop:/etc/network# iptables -L -t nat
Chain PREROUTING (policy ACCEPT)
target prot opt source destination
REDIRECT tcp -- 10.1.128.0/22 anywhere tcp dpt:www redir ports 3128
Chain POSTROUTING (policy ACCEPT)
target prot opt source destination
MASQUERADE 0 -- 10.1.128.0/22 anywhere
Chain OUTPUT (policy ACCEPT)
target prot opt source destination
root@bullock-desktop:/etc/network#
建置一部transparent proxy
transparent proxy,也就是透通性 的WEB Proxy,
讓一般的PC在存取web port時(通常是80),
gateway 能夠把這個 request 導向給 web proxy server,
由 web proxy server 代為抓資料,然後回應給PC。
transparent proxy 好處就是,PC不用再特定設定 proxy,
就可以自行由 gateway 達成這個目的。
而整體的對外網路頻寬可以因為 proxy 的機制,達到節省頻寬的目的,
讓web browser避免重複抓取相同的資料。
不過我認為未必啦!因為現在互動的網頁比比皆是,
若是讀靜態網頁,效果才會好。
但若是我把proxy設得够好的話,也是有達到網路安全防護的功能,
比如說,限制下載,限制讀一些哩哩叩叩的網站,這倒也不失為一個好方案!
transparent proxy,需要一台 proxy 身兼router(gateway)的服務。
以下範例:
一台 Linux 主機,提供 NAT功能,上面同時跑 squid proxy 服務於 3128 port 。
但我只用一張網卡eth0!因為我本身就能上網,只是要讓我的PC來當SERVER用罷了。
首先把squid.conf 設定好,以便於可能使用 transparent proxy 機制。
我改了預設的規則如下
acl localhost src 127.0.0.1/255.255.255.255
->acl localhost src 10.1.1.0/255.255.255.0
這樣一來可以讓10.1.1.1到10.1.1.254近兩百多部的電腦,
透過我設定的transparent proxy上internet!
以一台P3等級的普通PC建置成的SERVER,够本了!
接著還有增加squid.conf 的一些內容,
httpd_accel_host proxy.xxx.com.tw
httpd_accel_port 80
httpd_accel_with_proxy on
httpd_accel_uses_host_header on
改好記得重啓squid服務!
(see: http://www.squid-cache.org/Doc/FAQ/FAQ-15.html#ss15.4 )
上面的 proxy.xxx.com.tw 請改成該 proxy 主機名稱。(記得hosts或dns)
接著是 NAT機制設定。
以 kernel 2.2 來說,是這般設定:
#echo "1" > /proc/sys/net/ipv4/ip_forward
#ipchains -P forward DENY
#ipchains -A forward -i eth0 -j MASQ -s 192.168.1.0/24
#ipchains -M -S 86400 86400 360 <-- 這是讓 timeout 拉長一點 #modprobe ip_masq_ftp <-- 掛入 ftp 等 module 處理 ftp 相關連結問題 #ipchains -A input -i eth1 -p tcp -s xxx.xxx.xxx.xxx/netmask -d 0/0 \ #--dport 80 -j REDIRECT 3128 #ipchains -A forward -i eth0 -s xxx.xxx.xxx.xxx/netmask -d 0/0 -j MASQ 設定好後,只要是 xxx.xxx.xxx.xxx 這些 private ip 對外發出 port 80 的 request 後, 就會導向給我建的 NAT主機上的 port 3128, 然後由 squid cache server 代為 proxy 資料。 使用 kernel 2.4 的話: #echo "1" > /proc/sys/net/ipv4/ip_forward
#modprobe ip_tables <-- 這是編譯核心是選擇 module 才需要 #modprobe ip_nat_ftp <-- 同上,處理 ftp 等連結問題 #modprobe ip_conntrack #modprobe ip_conntrack_ftp #modprobn ip_conntrack_irc #iptables -t nat -A PREROUTING -p tcp -s xxx.xxx.xxx.xxx/netmask \ #--dport 80 -j REDIRECT --to-ports 3128 #iptables -t nat -A POSTROUTING -s xxx.xxx.xxx.xxx/netmask -j MASQUERADE 由於現在用的linux版本,太多是kernel 2.4以上,所以kernel 2.2的範例看看就好了。 而上面一太串的指令,最好是寫成shell script來使用,免得每次都要打一堆文字,煩! 還有echo那行,可以找/etc/sysctl.conf搞定。
我上網找到的參考資料,大部份是squid2.5版本的設定方式,
也就是上頭曾提到的squid寫法。
以下節錄自鳥站...
[root@test root]# vi /usr/local/squid/etc/squid.conf
# 這裡請填入你的 Proxy 主機名稱 與 port !
httpd_accel_host vbird.adsldns.org
# 因為我們是要進行 WWW 的資料快取,所以 port 當然就是 80 囉!
httpd_accel_port 80
# 這個很重要!因為設定 httpd_accel_host 之後, cache 的設定會自動被終止,
# 必須要加上這個設定為 on 之後,才能提供 cache 的功能!
httpd_accel_with_proxy on
httpd_accel_uses_host_header on
哇哩咧!怎麼試都不行,原來是它修正了設定方式,改簡單了哦!
我們只要編輯squid.conf這個檔,把http_port 3128,改成http_port 3128 transparent。
就可以了,加一個字就成,神吧!別忘了重啓squid。
參考文件...
讓一般的PC在存取web port時(通常是80),
gateway 能夠把這個 request 導向給 web proxy server,
由 web proxy server 代為抓資料,然後回應給PC。
transparent proxy 好處就是,PC不用再特定設定 proxy,
就可以自行由 gateway 達成這個目的。
而整體的對外網路頻寬可以因為 proxy 的機制,達到節省頻寬的目的,
讓web browser避免重複抓取相同的資料。
不過我認為未必啦!因為現在互動的網頁比比皆是,
若是讀靜態網頁,效果才會好。
但若是我把proxy設得够好的話,也是有達到網路安全防護的功能,
比如說,限制下載,限制讀一些哩哩叩叩的網站,這倒也不失為一個好方案!
transparent proxy,需要一台 proxy 身兼router(gateway)的服務。
以下範例:
一台 Linux 主機,提供 NAT功能,上面同時跑 squid proxy 服務於 3128 port 。
但我只用一張網卡eth0!因為我本身就能上網,只是要讓我的PC來當SERVER用罷了。
首先把squid.conf 設定好,以便於可能使用 transparent proxy 機制。
我改了預設的規則如下
acl localhost src 127.0.0.1/255.255.255.255
->acl localhost src 10.1.1.0/255.255.255.0
這樣一來可以讓10.1.1.1到10.1.1.254近兩百多部的電腦,
透過我設定的transparent proxy上internet!
以一台P3等級的普通PC建置成的SERVER,够本了!
接著還有增加squid.conf 的一些內容,
httpd_accel_host proxy.xxx.com.tw
httpd_accel_port 80
httpd_accel_with_proxy on
httpd_accel_uses_host_header on
改好記得重啓squid服務!
(see: http://www.squid-cache.org/Doc/FAQ/FAQ-15.html#ss15.4 )
上面的 proxy.xxx.com.tw 請改成該 proxy 主機名稱。(記得hosts或dns)
接著是 NAT機制設定。
以 kernel 2.2 來說,是這般設定:
#echo "1" > /proc/sys/net/ipv4/ip_forward
#ipchains -P forward DENY
#ipchains -A forward -i eth0 -j MASQ -s 192.168.1.0/24
#ipchains -M -S 86400 86400 360 <-- 這是讓 timeout 拉長一點 #modprobe ip_masq_ftp <-- 掛入 ftp 等 module 處理 ftp 相關連結問題 #ipchains -A input -i eth1 -p tcp -s xxx.xxx.xxx.xxx/netmask -d 0/0 \ #--dport 80 -j REDIRECT 3128 #ipchains -A forward -i eth0 -s xxx.xxx.xxx.xxx/netmask -d 0/0 -j MASQ 設定好後,只要是 xxx.xxx.xxx.xxx 這些 private ip 對外發出 port 80 的 request 後, 就會導向給我建的 NAT主機上的 port 3128, 然後由 squid cache server 代為 proxy 資料。 使用 kernel 2.4 的話: #echo "1" > /proc/sys/net/ipv4/ip_forward
#modprobe ip_tables <-- 這是編譯核心是選擇 module 才需要 #modprobe ip_nat_ftp <-- 同上,處理 ftp 等連結問題 #modprobe ip_conntrack #modprobe ip_conntrack_ftp #modprobn ip_conntrack_irc #iptables -t nat -A PREROUTING -p tcp -s xxx.xxx.xxx.xxx/netmask \ #--dport 80 -j REDIRECT --to-ports 3128 #iptables -t nat -A POSTROUTING -s xxx.xxx.xxx.xxx/netmask -j MASQUERADE 由於現在用的linux版本,太多是kernel 2.4以上,所以kernel 2.2的範例看看就好了。 而上面一太串的指令,最好是寫成shell script來使用,免得每次都要打一堆文字,煩! 還有echo那行,可以找/etc/sysctl.conf搞定。
我上網找到的參考資料,大部份是squid2.5版本的設定方式,
也就是上頭曾提到的squid寫法。
以下節錄自鳥站...
[root@test root]# vi /usr/local/squid/etc/squid.conf
# 這裡請填入你的 Proxy 主機名稱 與 port !
httpd_accel_host vbird.adsldns.org
# 因為我們是要進行 WWW 的資料快取,所以 port 當然就是 80 囉!
httpd_accel_port 80
# 這個很重要!因為設定 httpd_accel_host 之後, cache 的設定會自動被終止,
# 必須要加上這個設定為 on 之後,才能提供 cache 的功能!
httpd_accel_with_proxy on
httpd_accel_uses_host_header on
[root@test root]# /usr/local/squid/sbin/squid -k reconfigure
但由於我安裝的ubuntu7.4內建的squid版本是2.6,哇哩咧!怎麼試都不行,原來是它修正了設定方式,改簡單了哦!
我們只要編輯squid.conf這個檔,把http_port 3128,改成http_port 3128 transparent。
就可以了,加一個字就成,神吧!別忘了重啓squid。
參考文件...
想換BLOG的樣版
一直覺得現在用的BLOG樣版範本醜醜的,但是又不曉得怎麼改!
看了一下,發現它的樣版系統好像是xml。
唉!不熟耶~怎麼辦?
沒想到,一頭鑽到電腦資訊的世界,
真的是一條不歸路。
學不完啊!
最近找到一個網站,在推網路封包監聽軟體的。
E-Detective
記得剛進公司時,就想找這類的產品,
因為身為網管人員,我自認為自己的網管知識和技術,只是中等而已。
如果可以找到相輔相成的軟體,應該可以在工作上,提高業務的成效才是!
這個網站,也提供了一些網管政策,
若是一般公司想做更嚴謹的控管,可以參考一下內容。
我摘錄一小段:
貳. 非合理之使用:
全文請看...
而XML嘛!我應該會去學的,不然誰要幫我改版面?
看了一下,發現它的樣版系統好像是xml。
唉!不熟耶~怎麼辦?
沒想到,一頭鑽到電腦資訊的世界,
真的是一條不歸路。
學不完啊!
最近找到一個網站,在推網路封包監聽軟體的。
E-Detective
記得剛進公司時,就想找這類的產品,
因為身為網管人員,我自認為自己的網管知識和技術,只是中等而已。
如果可以找到相輔相成的軟體,應該可以在工作上,提高業務的成效才是!
這個網站,也提供了一些網管政策,
若是一般公司想做更嚴謹的控管,可以參考一下內容。
我摘錄一小段:
貳. 非合理之使用:
1. | 個人商業使用 |
2. | 寄發垃圾郵件, 故意散播電腦病毒, 架設網站個人, FTP, Mail server …相關不當使用行為 |
3. | 散播公司機密 |
4. | 任何非法目的 |
5. | 故意造成任何網路、資訊服務、設備之中斷或干擾 |
6. | 故意使他人閱讀將導致公司須對該他人負妨害風化或平等工作 機會等相關法律責任之內容 |
7. | 故意下載或要求軟體或媒體檔案或資料而有理由相信將會佔用 過多的頻寬 |
全文請看...
而XML嘛!我應該會去學的,不然誰要幫我改版面?
訂閱:
文章 (Atom)
搜尋此網誌
本站大事記
這個部落格(網站)內容以分享LINUX和延伸出的技術文章為主!
特別是為了工作和進修需要,搜集了不少網站連結。
希望對來這裡觀文的朋友們,有提供一些有用的資訊或文章。
但這裡的文章中,也包含個人的心情扎記和隨興言談……
若是當中沒有對上你的口味,請多包涵!
特別是為了工作和進修需要,搜集了不少網站連結。
希望對來這裡觀文的朋友們,有提供一些有用的資訊或文章。
但這裡的文章中,也包含個人的心情扎記和隨興言談……
若是當中沒有對上你的口味,請多包涵!
原「琳娜絲與希斯寇的邂逅」,改名為「愛上琳娜絲」!
--原序文--
就是當LINUX遇上CISCO啦!他們的結合還能作什麼事…不就是讓這個世界的網路,串…串起來啊…不然你們那能上這網站看部落格!
--原序文--
就是當LINUX遇上CISCO啦!他們的結合還能作什麼事…不就是讓這個世界的網路,串…串起來啊…不然你們那能上這網站看部落格!
我的網誌清單
-
-
-
-
-
-
-
-
-
-
-
-
-
-
-
-
-
一個多月..14 年前